All Projects
What is it?
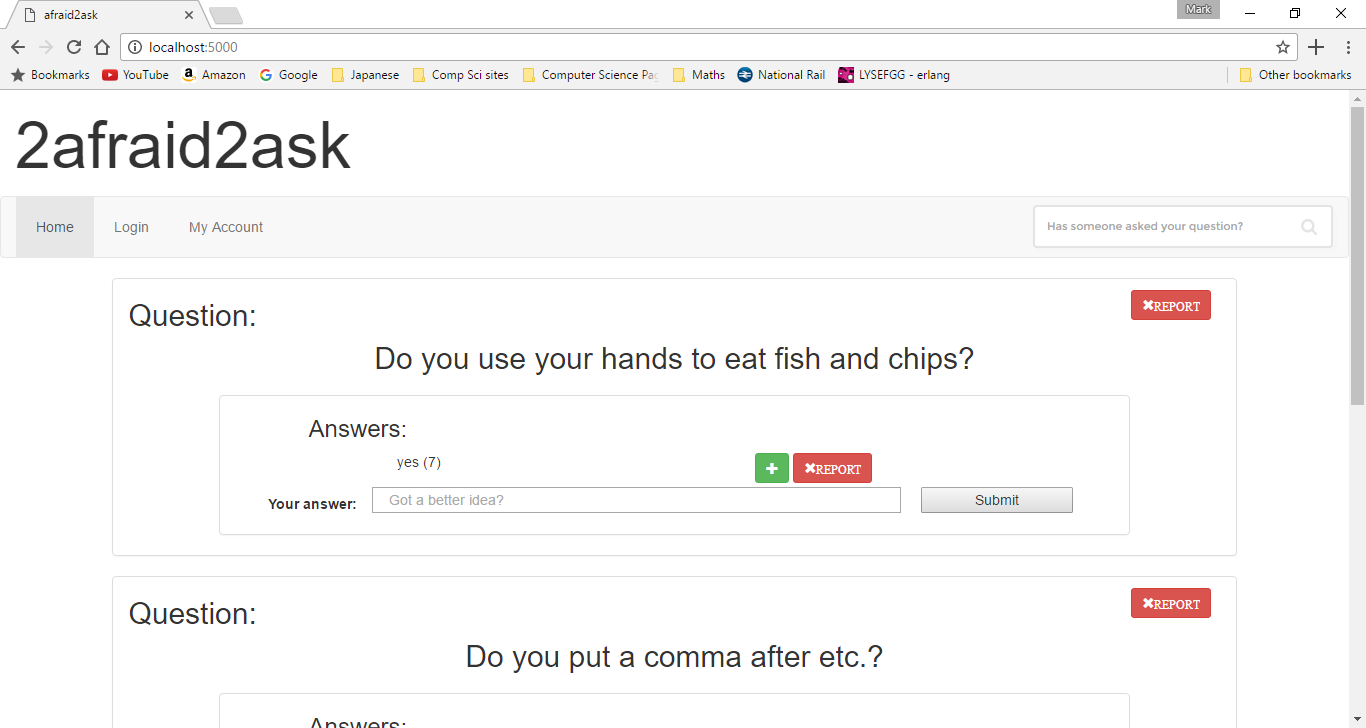
2afraid2ask is a basic polling website which was made during the HackNotts Hackathon. The purpose of the site is to create small stupid questions that you have always wanted to know the answer to, but never had the courage to ask anyone. These questions (or polls) are displayed on the main page of the site where other users can vote on what they think the answer is. If they don't agree with any of the current answers then they can create their own (provided that they are logged into the site). One of the objectives of the Hackathon was to raise awareness of cyber-bullying. This meant that we should incorporate some sort of reporting functionality or an equivalent to our projects. For us, reporting offensive polls or answers would be a great inclusion to the project.
How was it made?
The site is built using many dependencies and languages:
- Python with flask - for all the server side behavior
- Jinja - HTML templating for the python objects
- Algolia Search - Search through JSON data structures
- HTML, CSS and JS - Display styled content in the web browser
- Bootstrap - Quickly create good looking webpages
- bcrypt - Password hashing + salting
Changes
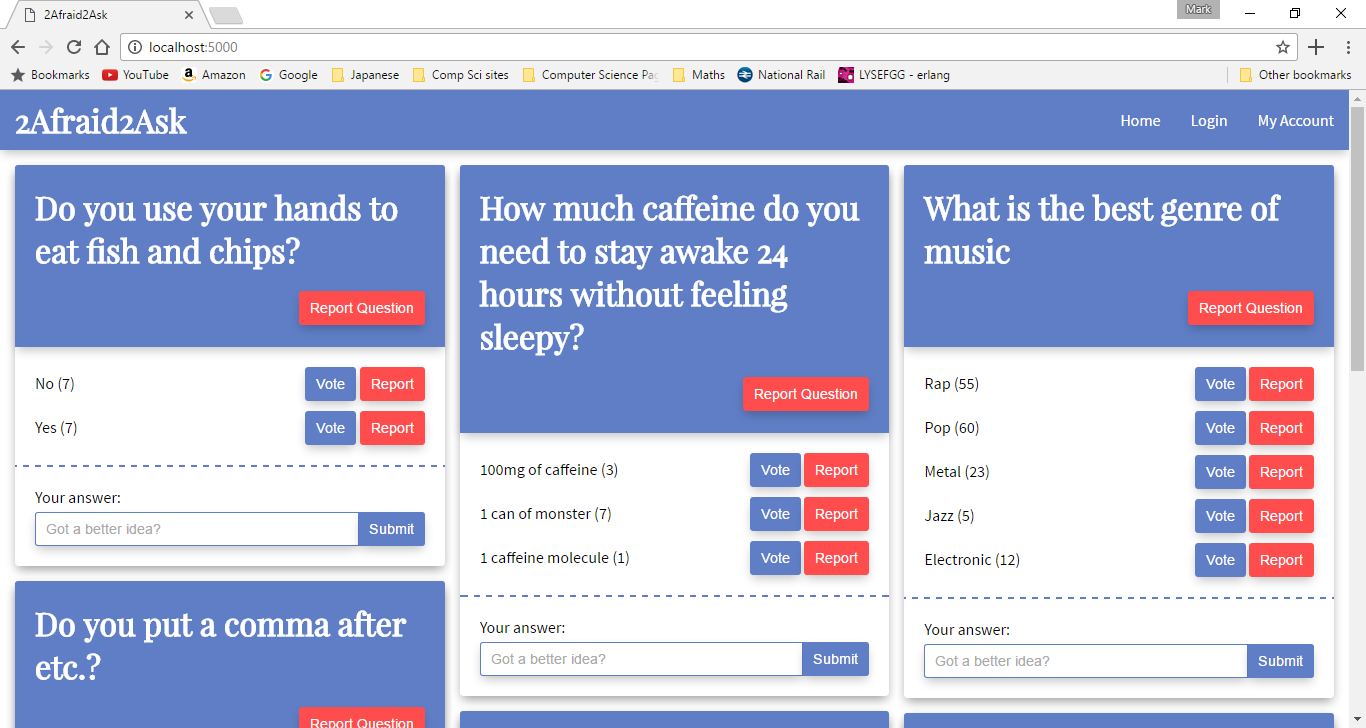
Since the Hackathon, I have updated the design and some functionality of the site. The biggest change is the look of the home page. More polls can now fit on the screen at any given time and there is a nice bit of responsive design too! Unfortunately, I did have to remove the search functionality as our quota for the free trial of Algolia search had been reached (Sorry Jem and Owen).
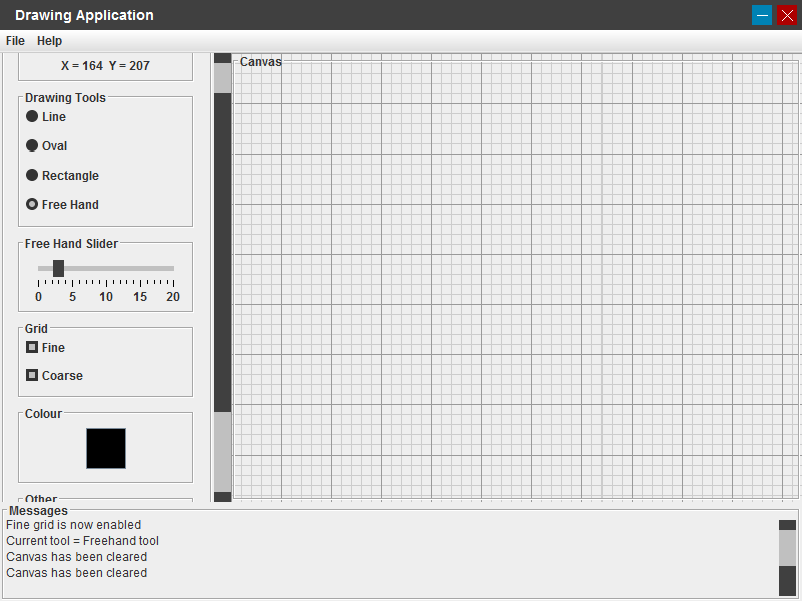
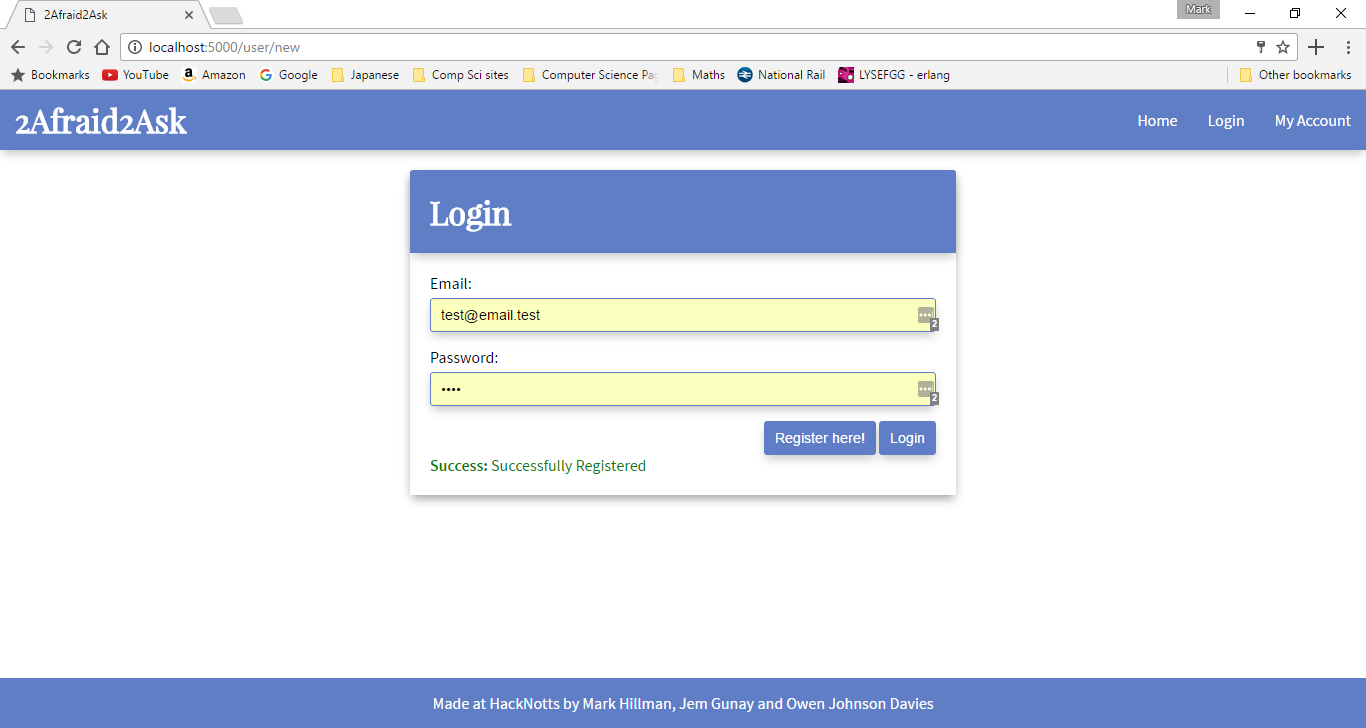
Screenshots:
Links:
Description
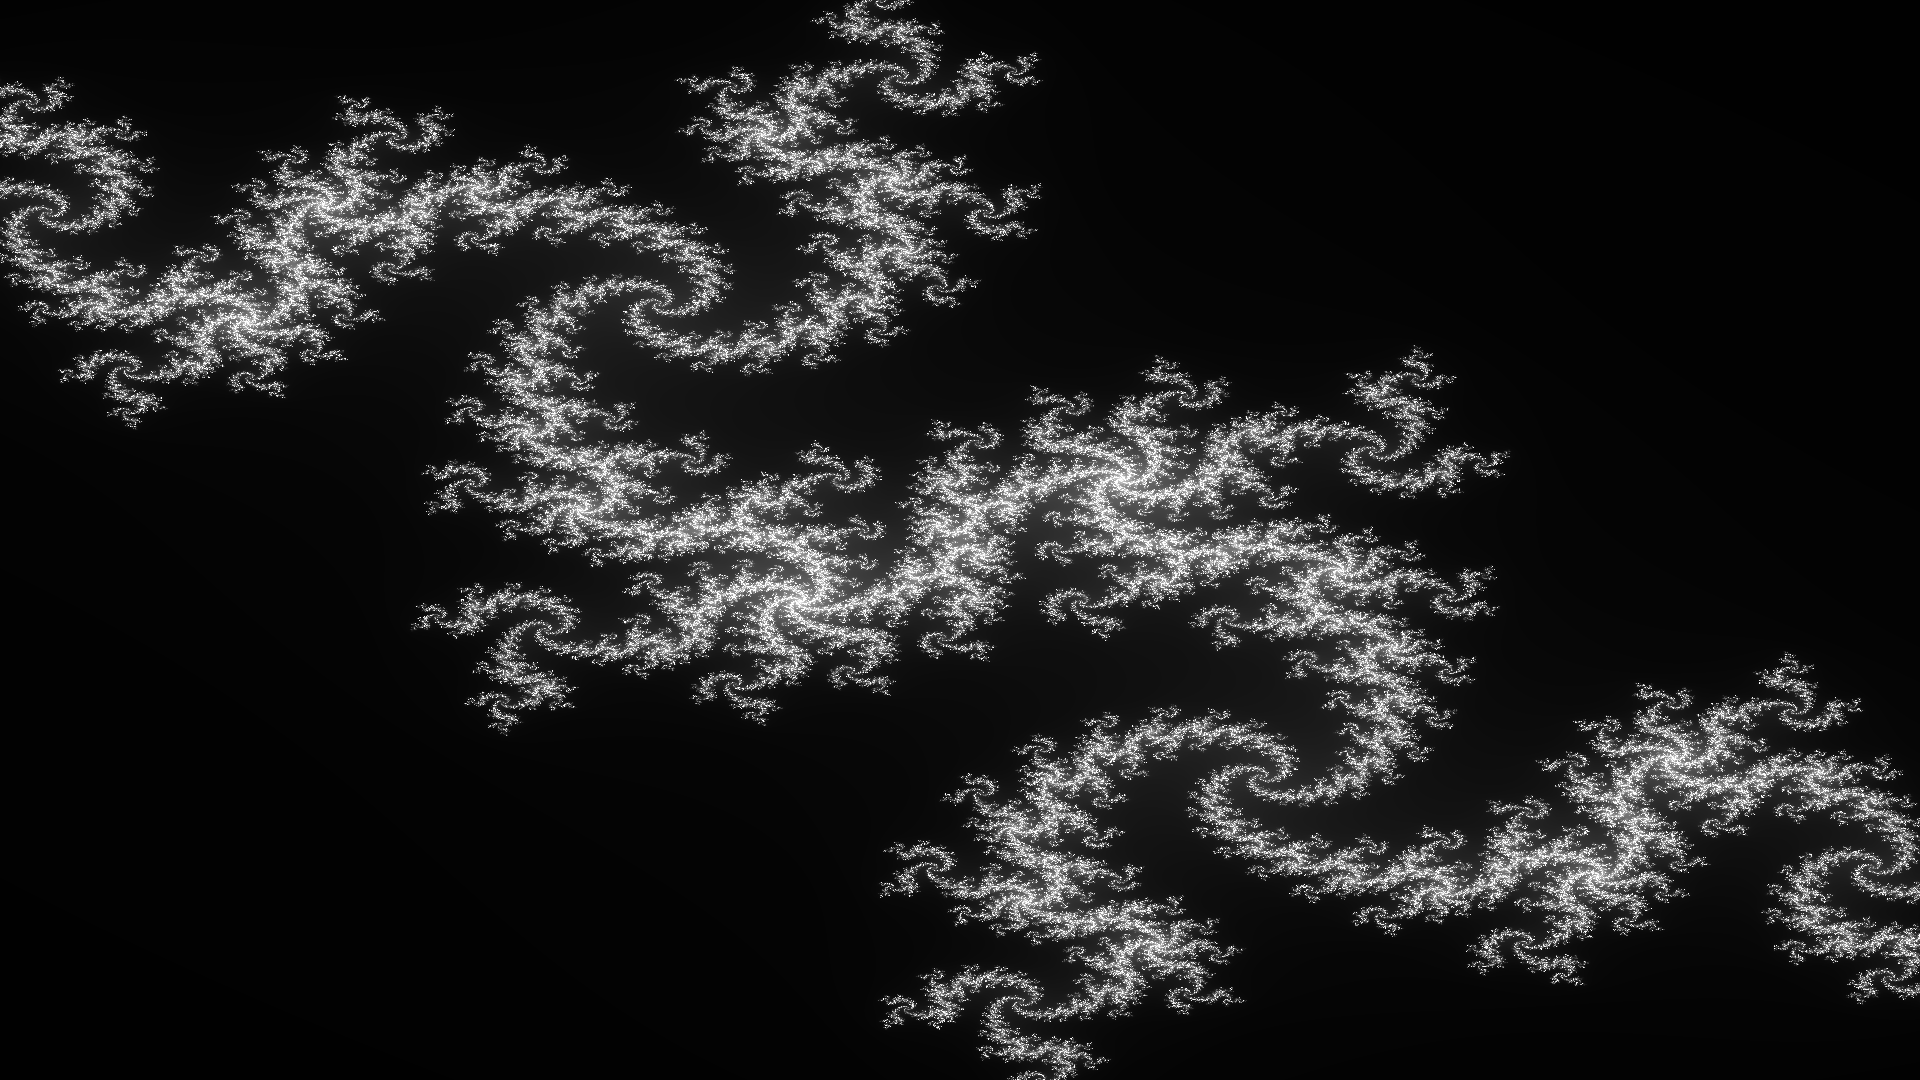
This challenge was picked from the r/dailyprogrammer subreddit. The challenge is to generate Julia set fractals from the complex number plane and produce an image as the output. This was a great chance to use Go as one of the bonus challenges is to make the solution run in parallel. This meant that using goroutines was an easy way to solve what could have been a much more difficult challenge.
I added a few options to the package so that the user can change the function that decides the Julia set (which also happened to be a bonus round). This is done by calling the
SetComplexFunction
function and supplying it with a function that has the signature of
func(complex128, complex128) complex128
. The first parameter is the current complex number on this iteration, and the second is the original complex number for the pixel value. This second parameter allows the generation of the basic Mandelbrot set. I've also added the option to change the complex number range, this allows me to zoom in or out of a particularly interesting set (I use this to view the whole Mandelbrot set).
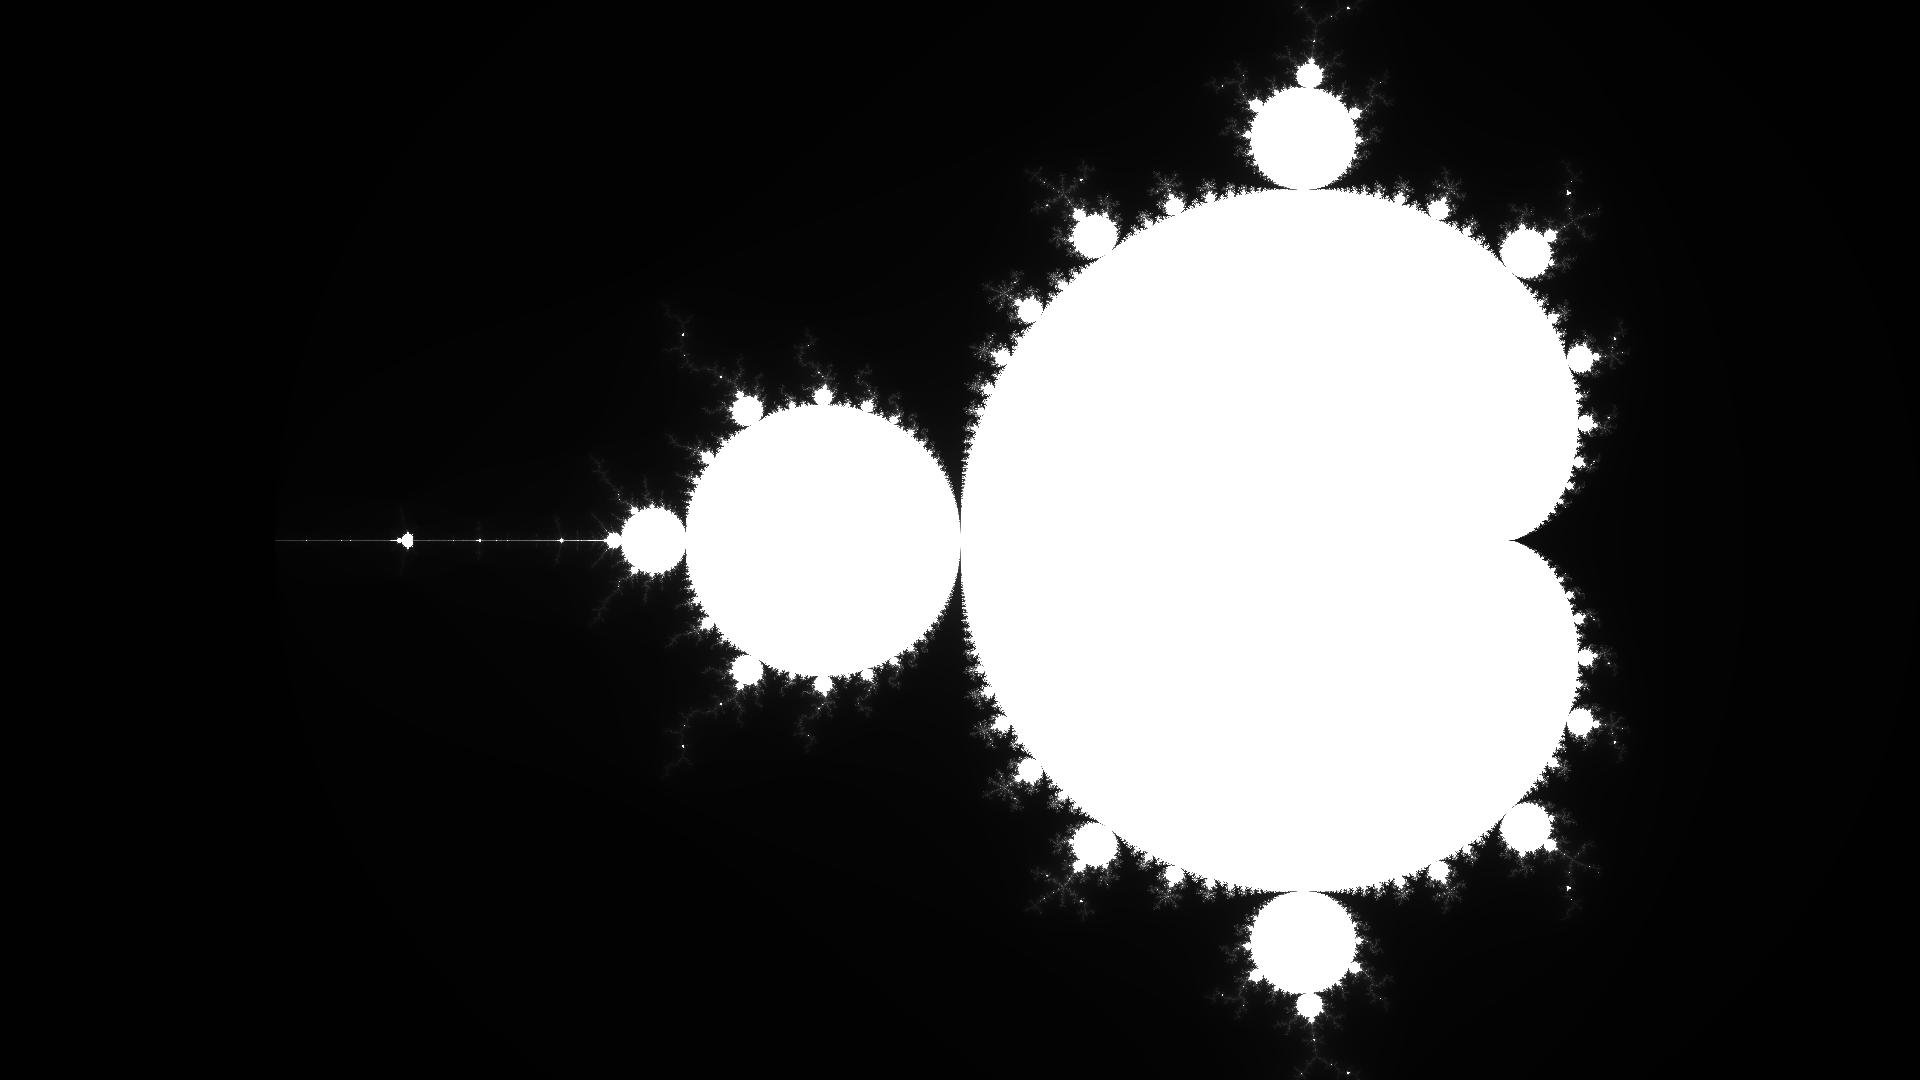
Mandelbrot Set
Even though this package was mostly built for the creation of Julia set images, you can also display the Mandelbrot set and other complex fractals by using the
SetComplexFunction
. Mandelbrot is defined by the function $f_c(z) = z^2 + c$ where $c$ is the complex number and $z$ is the iteration. This is more explicit when represented recursively, $z_{n} = z^2_{n-1} + c$. The code snippet below shows how to draw the Mandelbrot set using this package.
julia.SetComplexFunction(func(c, orig complex128) complex128 {
return c*c + orig
})
julia.SetComplexRange(complex(-2.5, -1), complex(1, 1))
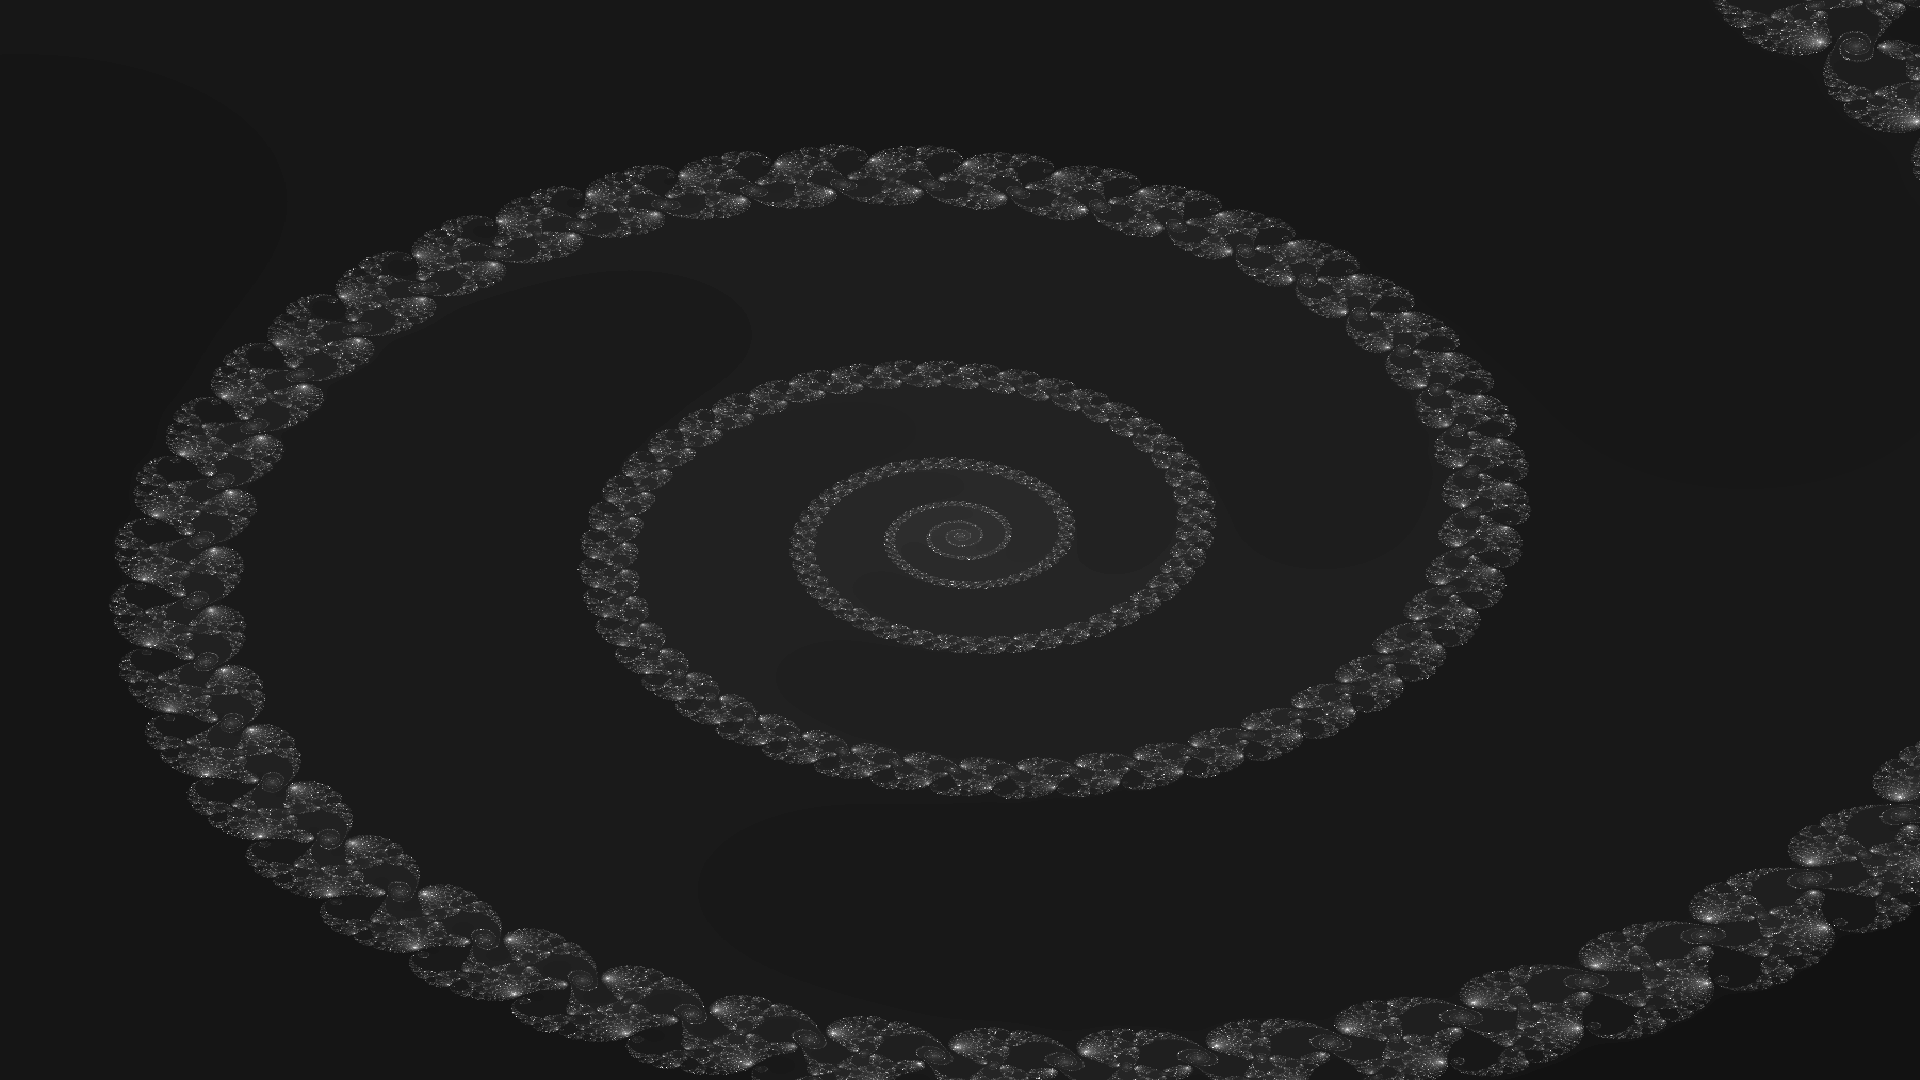
julia.CreateImage("image.png", 1920, 1080)Zooming Into A Fractal
As previously mentioned you can zoom into a fractal by using the
SetComplexZoom
and
SetMaxIteration
functions. We can also alter the contrast of the image using the
SetContrast
function. This will help to show the patterns more clearly.
The snippet below shows how to zoom into the Mandelbrot set. For other interesting coordinates, you can look at http://www.cuug.ab.ca/dewara/mandelbrot/images.html.
julia.SetComplexFunction(func(c, orig complex128) complex128 {
    return c*c + orig
})
julia.SetColorFunction(func(col uint8) *color.RGBA {
    return &color.RGBA{col, col, col, 255}
})
julia.SetComplexZoom(complex(0.2549870375144766, -0.0005679790528465), 1.0e-13)
julia.SetContrastValue(50.0)
julia.SetMaxIteration(5000)
julia.CreateImage("image.png", 1920, 1080)
Feedback From A Friendly Redditor
After submitting my solution to the daily challenge, I received some great feedback from a more experienced Go programmer. One of this redditor's helpful suggestions was to re-evaluate my goroutines. This is because I could take advantage of pre-calculating some information, instead of having to calculate it for each pixel in the image. This was a huge speed increase for the project. Another useful tidbit was to use a named return variable. This is a really great way of making code more readable. While I had read about this in The Go Programming Language (Addison-Wesley) book, I could not truly appreciate it until now.
Screenshots:
Links:
Description
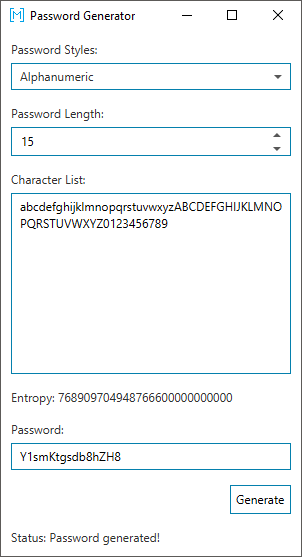
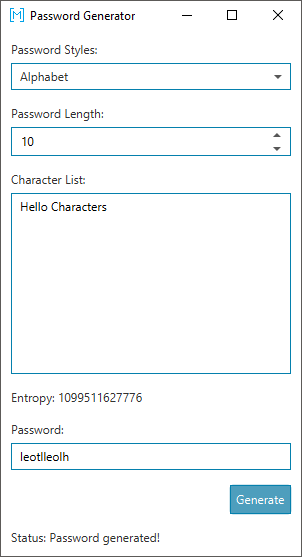
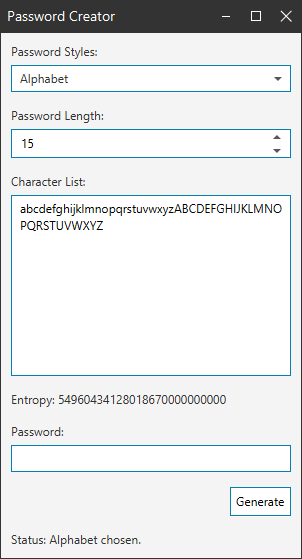
This is a basic password generator built using javaFX. The passwords are created using the character list specified in the TextArea, with a length from the password length spinner. Passwords are generated randomly selecting individual characters from the character list. It is important to note that this is not a set and therefore duplicate characters in the character list will increase the probability of that character occurring in the password. The entropy value signifies the variation in the password and is calculated by the following: Num of Characters $ = n$, Password length $= p$, Possible combinations $=n^p$. We can therefore calculate the password entropy (Shannon entropy) via $H = \log_2(n^p)$
This project has since been updated to use the javafx custom window decoration in order to give it a better aesthetic appeal. The project for this can be found in the UI section. The general gist is that I created an undecorated window and then added a styled BorderPane with drag controls, similar to that of the MWindow project.
Screenshots:
Links:
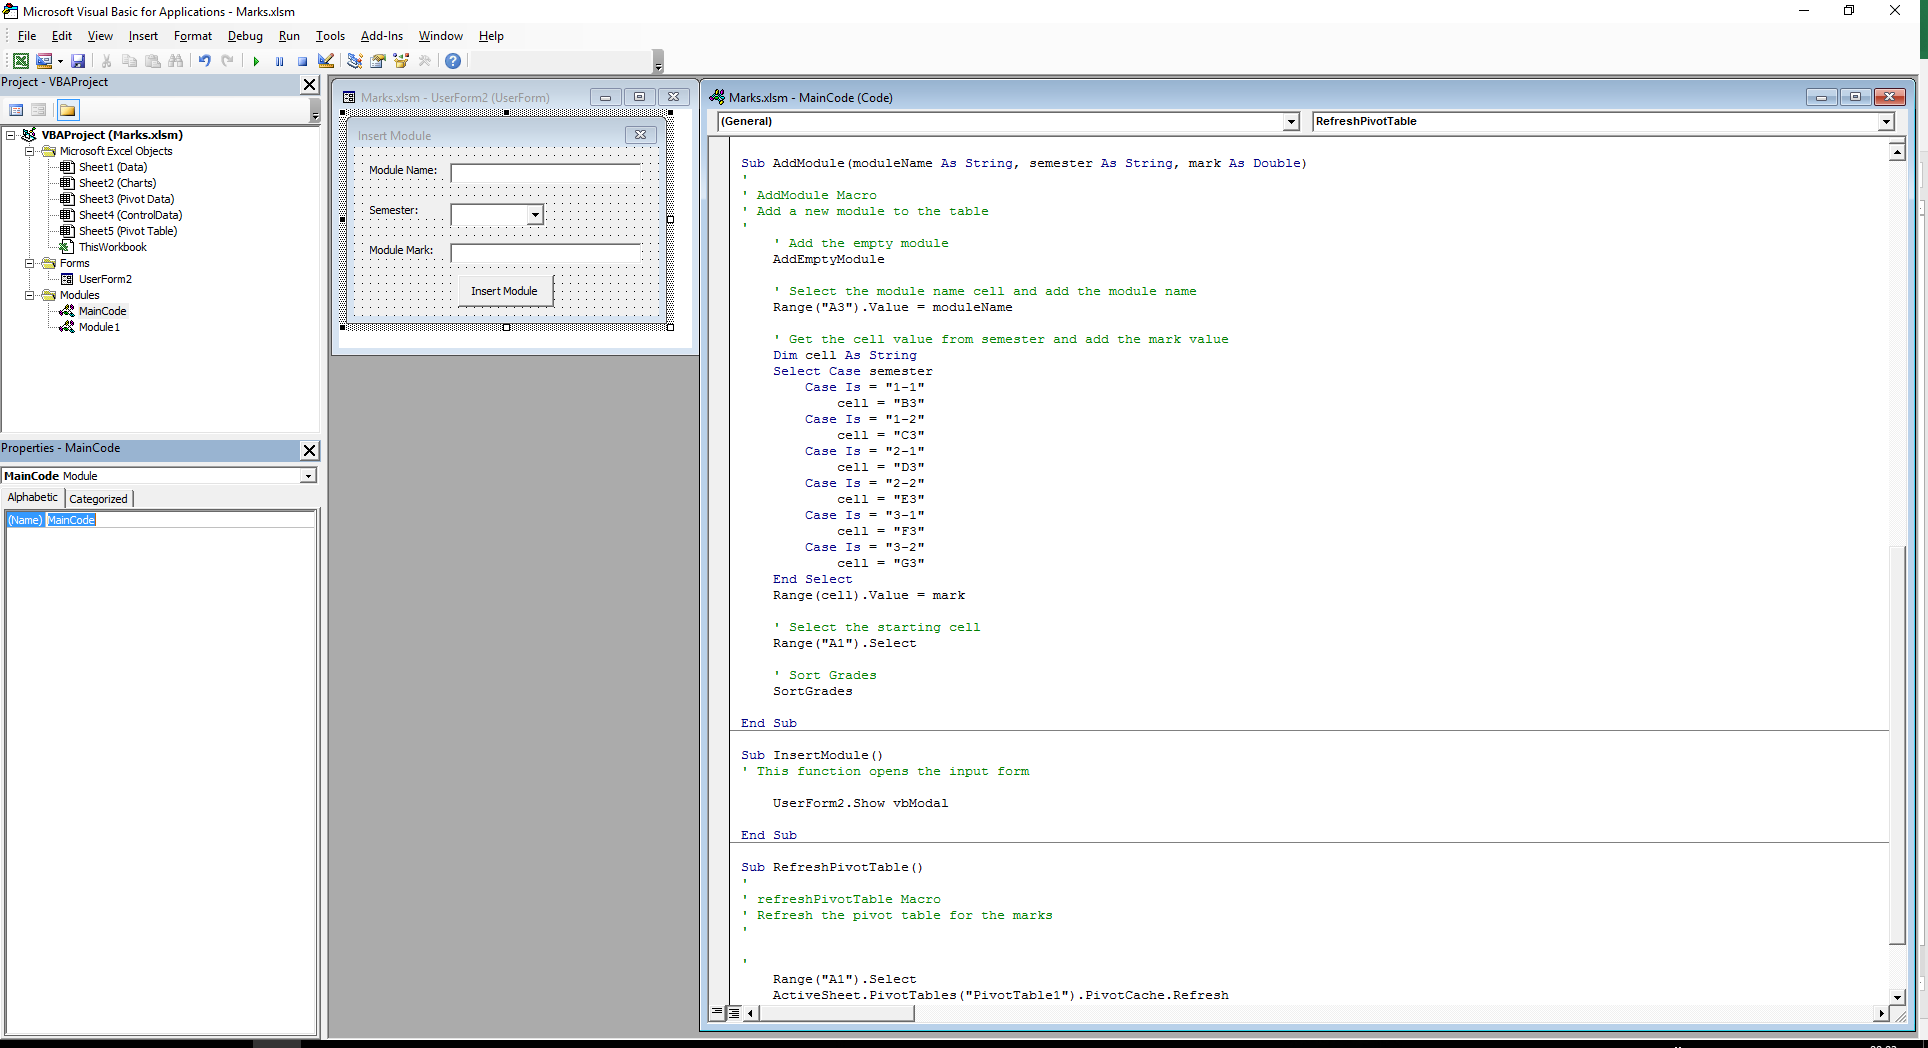
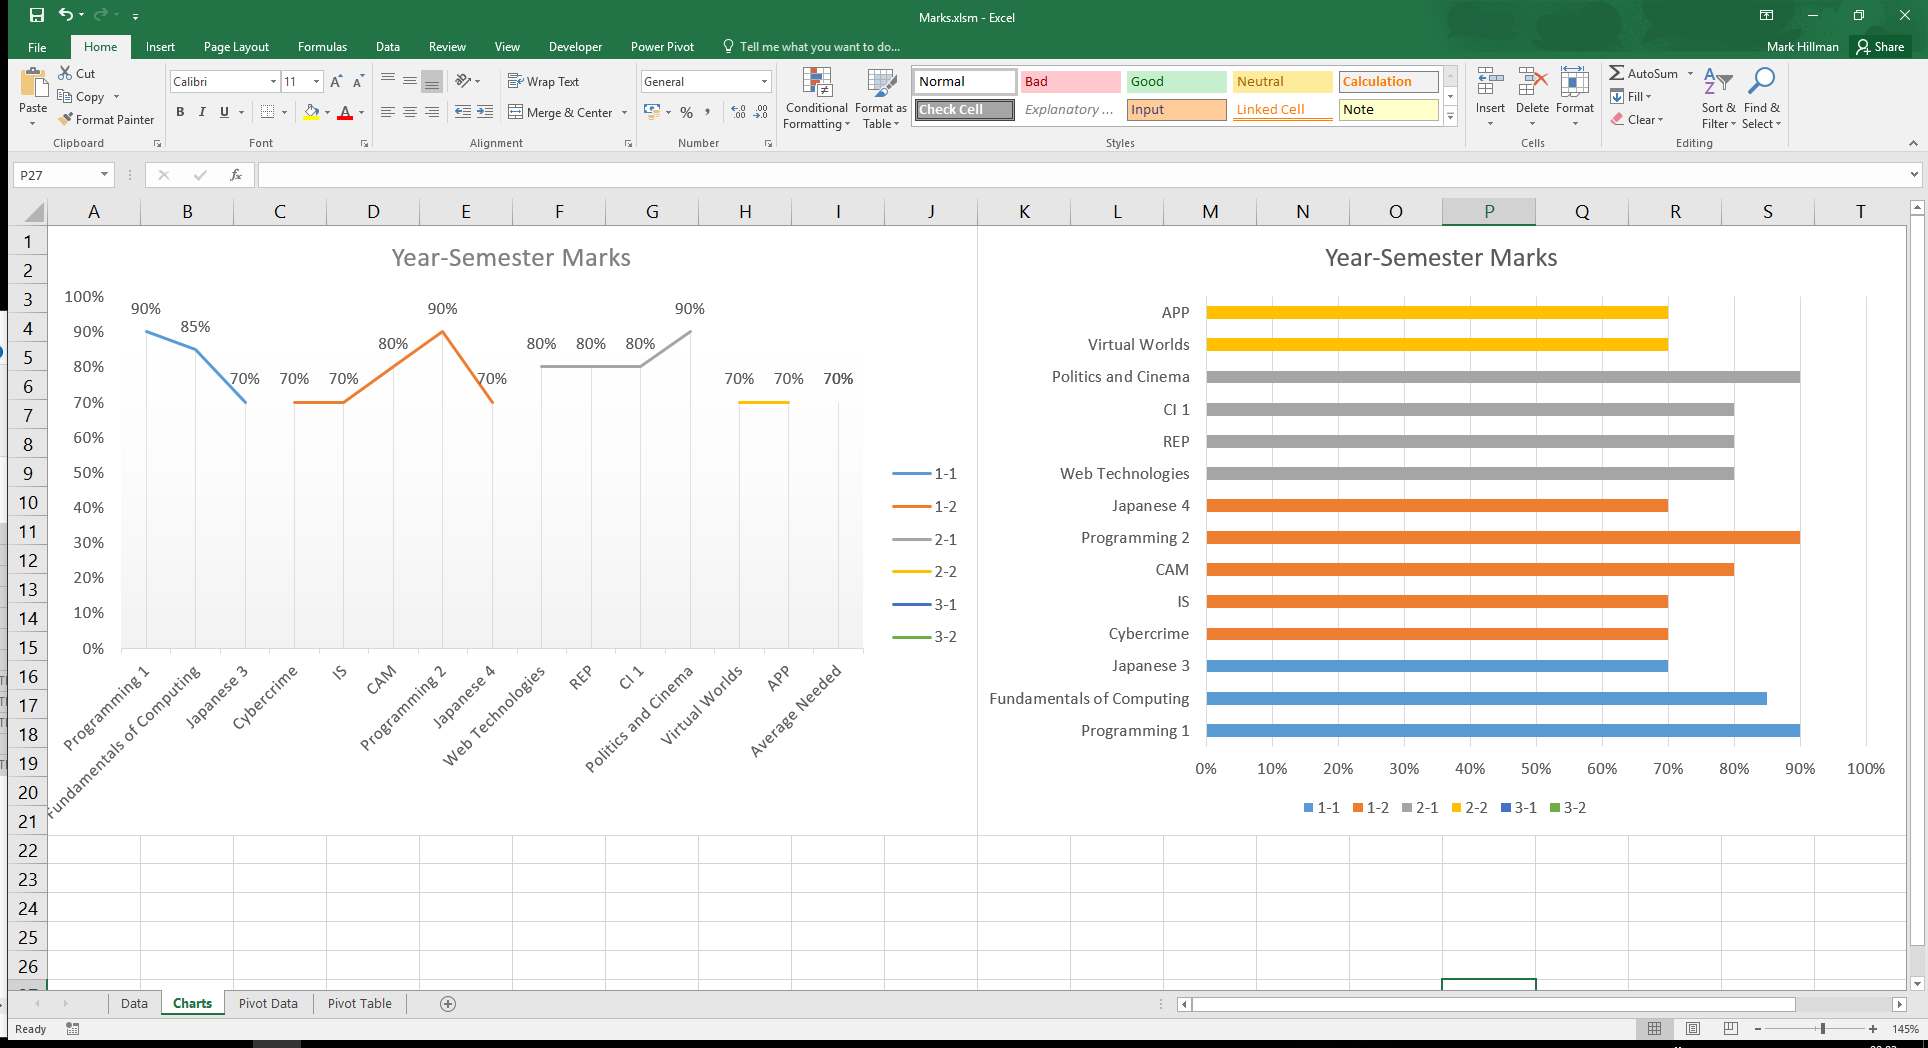
Description
This is a Microsoft Excel spreadsheet which I made in order to track my progress at university. So far, the spreadsheet can show you what you could get at the end of your degree, after inputting the marks that you currently have. There are a few more features that I would like to add:
- Code to grab the data from the main data page, and input it into the pivot table data
- Add a lot of error handling. Could be useful for handling division by 0 when there is nothing in the columns and you still want to know the average marks needed to get the grade of your choice
Whilst it is not yet 100% complete, it is still very usable. One useful feature of the spreadsheet is that it can calculate the average marks you need, to get the grade of your choice. The spreadsheet will also tell you what marks you currently have from your degree using the weighting system for Keele University. To make it applicable to a different university grading scheme, just change the weights at the bottom of the spreadsheet. Note: The default marks are just example data, and not my actual marks from modules.
Screenshots:

Links:
Description
A javascript tool to highlight regex pattern matches using HTML and CSS. Whilst this tool is primarily aimed at programming languages syntax highlighting, it can be used with any regular expression. Check out the GitHub page for more information!
This tool was used in order to create the syntax highlighting for this website. Instead of having the script running everytime though, I just converted the code to a version with syntax highlighting and added that to the HTML in a pre tag. This saves a bunch of processing time before the page is displayed. It is worth noting that there could still be some bugs when using the tool. It works best with smaller scripts which are not too complex syntactically. I have not made the language regex specifications for compressed scripts, so its best not to use this tool with those. Despite this, the syntax matching can be reduced so that fewer errors are made.
In case you do not need to run the script everytime, I have included a converter below. Now all you need to do is convert the string using the form below and add the output to your web page instead. Then all thats left is to include the CSS. Note: When creating custom JSON files, any backslashes in the regex need to be escaped with another backslash e.g \\bhello\\b. This is not the case with the single regex input as this is raw input so only needs single slashes e.g \bhello\b.
Online Converter
Screenshots:
Links:
Description
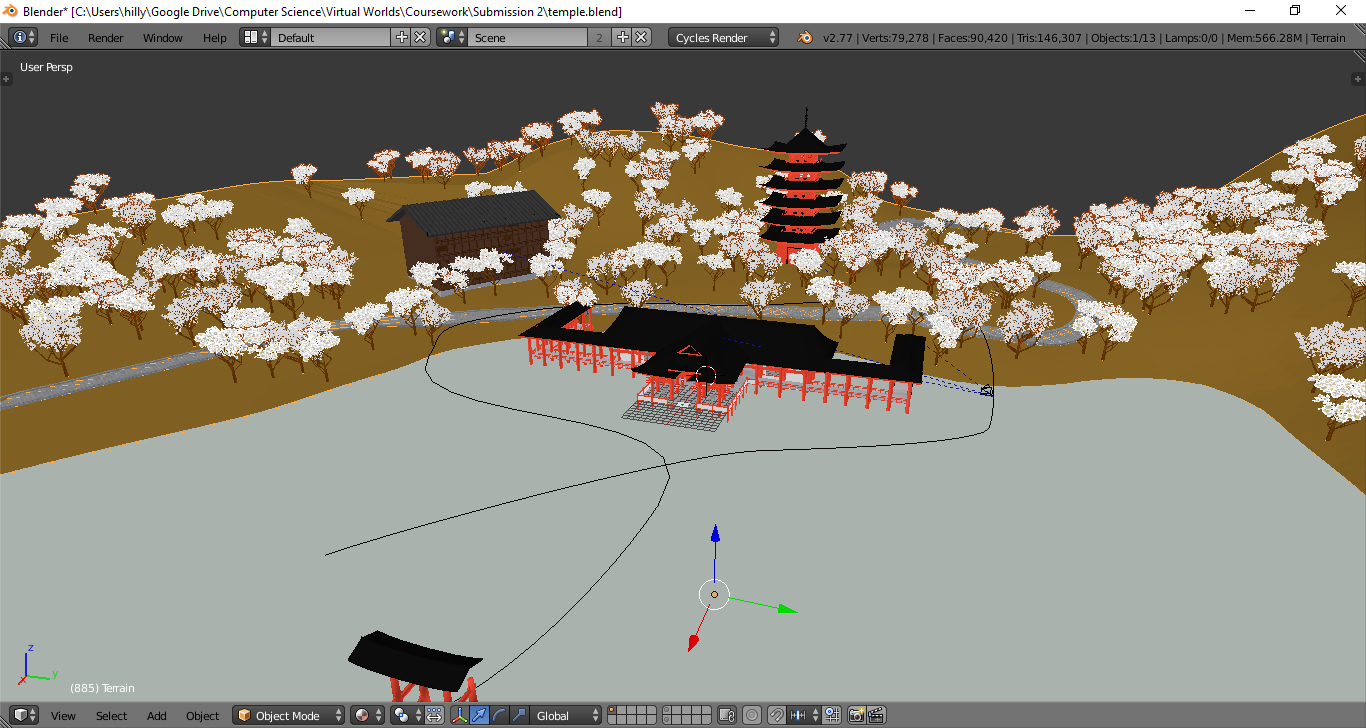
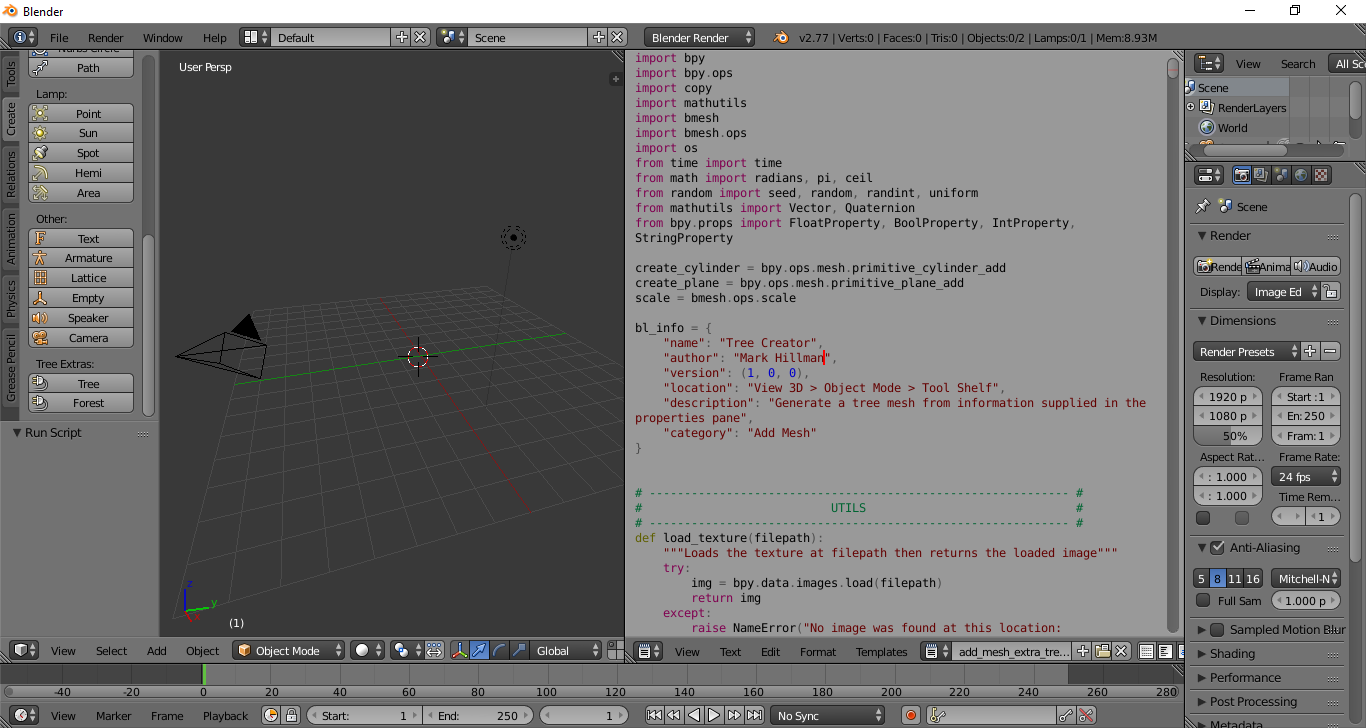
This project was created as part of a piece of coursework for a Virtual Worlds module. In this module we had to create a 3d scene using blender in order to produce an animation. The animation needed to be around 30 seconds to a minute long. In order to attract a good mark from the module, the scene had to demonstrate an ambience around the chosen topic, as well as being detailed and well-constructed. So for my topic I chose a Japanese temple scene. This project was an accompaniment to the main body of coursework, which required a small script that helped in the creation of the scene/animation. The blender script was used to create a small sampling of randomly generated trees which could then be used by the blender particle system later on. The mark I received for this module was 93%.
The script is a single file python script which can be loaded into blender in a few different ways. The first method is to open the script in the blender text editor and click the run script method. This will create a set of extra meshes which can be used from most of the add mesh menus. However, this will need to be repeated every time blender is closed and opened again. Another option is to install it in blender by using the preferences menu. This circumvents the previous methods faults.
In order to use the script, navigate to the add mesh menu options, then click the newly added tree button. This will open up a sub menu of different options for the tree (located at the bottom of the toolbar) which will help to change the shape and style of the tree. Once you are happy with the options you have selected, check the render tree option. Depending on the options you have chosen the tree could take a while to generate. Once the script has finished a new tree mesh will appear at your cursors location.
Example Video
Screenshots:

Links:
Description
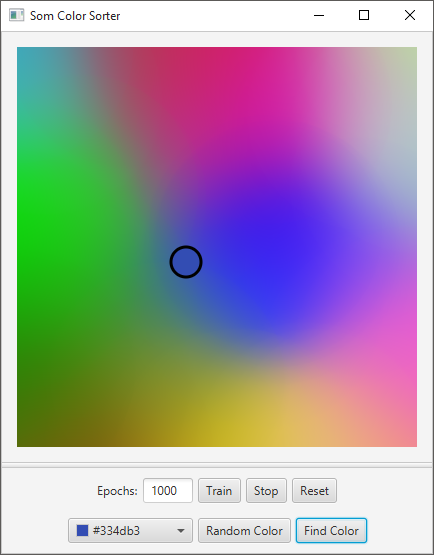
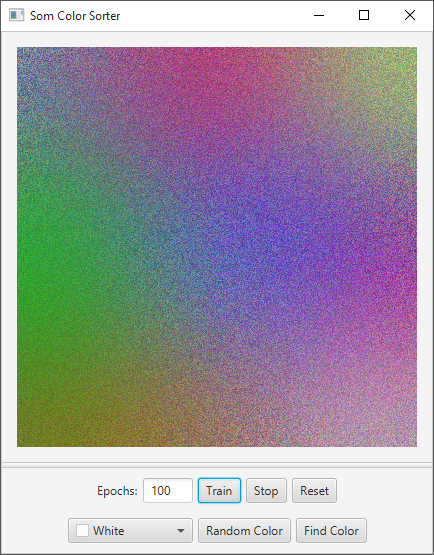
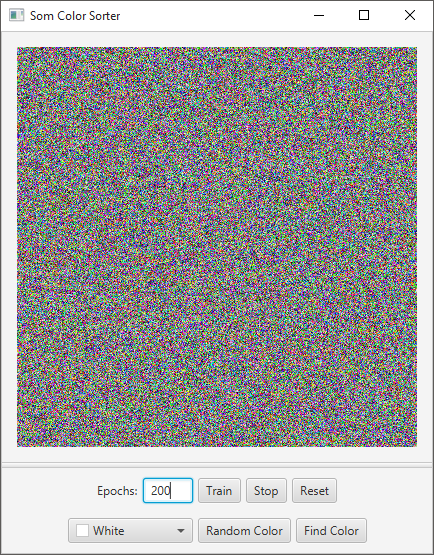
The SOM Color Sorter is an example of Kohohen's Self-Organising Map. The SOM will alter its weights in order to group together similar inputs. Once the weights are organised, then new input data can be classified using labels from the previous trainings inputs. SOMs can be used for identifying and sorting images into categories of like images. Likewise the SOM is able to identify images which are related to a given input image (Similar to the image search from Google).
Constructing the GUI for the SOM was somewhat of an annoying process due to using javaFX. As I am still quite new to using javaFX, some of the ins and outs of the application has changed since swing. One of the pitfalls I fell into was trying to use a standard thread in order to change something on the application. This meant that there was some glitching of the components. Likewise, I also found that using a writable image inside an ImageView can produce similar glitching and flickering. However, I managed to find a solution to the flickering by using a canvas which writes pixel values to an image the draws the image when the canvas is updated. Drawing pixel straight onto the canvas is a bit too slow for reasons unknown.
This project was created as a way of revising for a Computational Intelligence module. After being taught about SOM's I thought that the best way to learn about them, would be to create one. The outcome was very satisfying to see and this project was very enjoyable to make. Maybe some point in the future this could come in handy if I ever decide to make an image searching SOM for my computer.
Screenshots:
Links:
Description
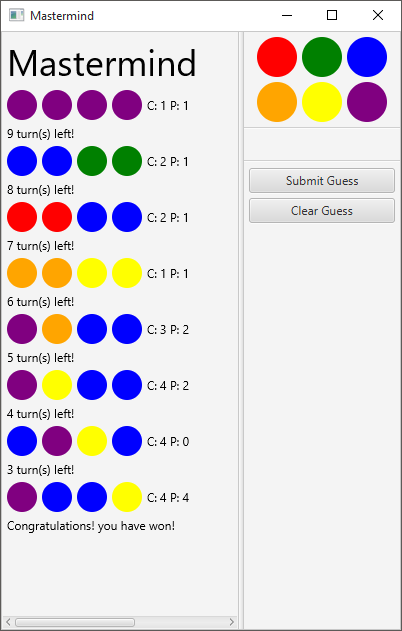
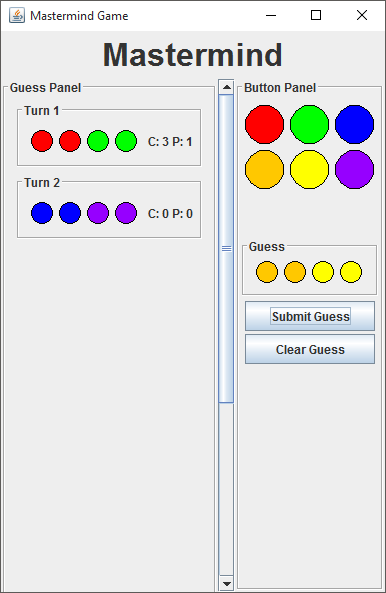
The idea behind this small challenge was to create a mastermind game for a user to play. The original concept was to allow for just textual inputs, and so have the game as a terminal based one. However, I found that the challenge was finished fairly quickly, so I decided to use this challenge as a way of recalling java swing and to learn javaFX.
The swing game was not too hard to create as I already knew all of the components and how they interacted with each other from when I was making mwindow. This meant that all I needed to do was to plan out the games UI layout. Once the layout draft had been made and I had a rough idea of how to implement it, I started to write the code for it. As far as actually writing the code for the swing application, I didn't have any real issues with it.
The javaFX version of the game however was more challenging to me as it was a new set of classes and window lifecycle to get used to. Luckily I have had a little bit of experience with android UI development and so getting used to the javaFX packages wasn't too much of a stretch. The Scene Builder tool allows for easy creation of FXML files, this made designing the UI much easier. Once I had gotten my head around how the javaFX packages work, I found them to be more useful than its java swing counterpart. Not to mention the fact that the basic look and feel for the javaFX components is much better.
Screenshots:
Links:
Description
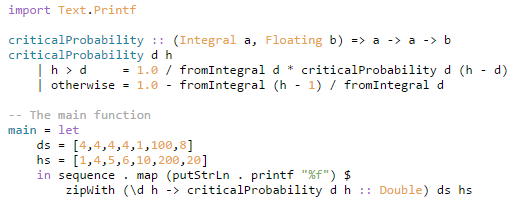
This Evolutionary Algorithm is a very simple one in which a string of characters will eventually be evolved towards, starting from a random string of characters. The individual's fitness will be ranked depending on the distance from the desired string so that only the individuals which are closer to the destination will be chosen for mutation and crossover by a roulette wheel selection method.
This project was created as a challenge to myself and a way of revising for a Computational Intelligence module. It was stemmed from a practical, in which we just had to implement the mutation and crossover. However, I thought that was too easy so I decided to create the toy problem's solution from scratch.
Examples
Input
EvolutionaryAlgorithm evo = new EvolutionaryAlgorithm(50, "Evolutionary Algorithm");
evo.shouldPrint(true);
evo.run();
Output
Generation: 0 | Best Individual: @r_GjxU'll"[:Fm{|SRGQF | Fitness: -518
Generation: 1 | Best Individual: @r_GjxU'll"[:Fm{|SRGQF | Fitness: -518
Generation: 2 | Best Individual: @r`djxU'll"[:Fm{|SRGQF | Fitness: -488
...
Generation: 1264 | Best Individual: Evolutionary Algoritgm | Fitness: -1
Generation: 1265 | Best Individual: Evolutionary Algorithm | Fitness: 0
Links:
Description
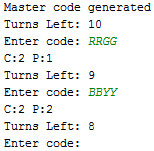
This challenge was picked from the r/dailyprogrammer subreddit. The challenge posed was to make a copy of the fallout hacking mini-game by pulling words from a given dictionary. The mini-game is a similar game to mastermind where the player has to guess a word and the game will tell them how many letters in the guessed word is in the correct position.
Examples
Output
What difficulty of game do you want? [1/2/3]
2

WAFTING
OVERRUN
SUPPERS
BLUNGES
OUTTROT
ECTOPIC
FUSSPOT
HOISTER
BURLIER
DALTONS
LUGSAIL

Enter your guess: wafting
7 letters correct
Congratulations you have guessed correctly!
Links:
Description
This project is a congregation of some of the designs and animations I was playing with when creating my Web Technologies coursework. The first one I am going to show you was the idea of a water selling company. For this idea, the main gist was the background animation as the coursework required that there must be a canvas animation present to spruce up the site. It is made by simply filling the area beneath a sine wave. Then animating the area beneath the sine wave using the setInterval() function and changing the parameters to the sine wave function. While I am aware of the window.requestAnimationFrame() function, which is the recommended way of creating animations using javascript, setInterval() was simple enough to make this. The main code for drawing the sine wave and the animation are shown below.
Wave
Sine Wave Code
//Set the animation interval
setInterval(function() {
    context.fillStyle = "white";
    context.fillRect(0, 0, canvas.width, canvas.height);
    fillSinWave(0, canvas.height / 2, canvas.width / frequency, amplitude, frequency, offset);
    offset += 0.1;
}, 20);

//Fill under a sine wave
function fillSinWave(xPos, yPos, distance, amplitude, oscilations, offset) {
    for (var i = 0; i < distance * oscilations; i++) {
        var y =  yPos - Math.sin((2 * Math.PI / distance) * i + offset) * amplitude;
        context.fillStyle = "lightblue";
        context.fillRect(xPos + i, y, 1, canvas.height - y);
    }
}
Observatory and Omega
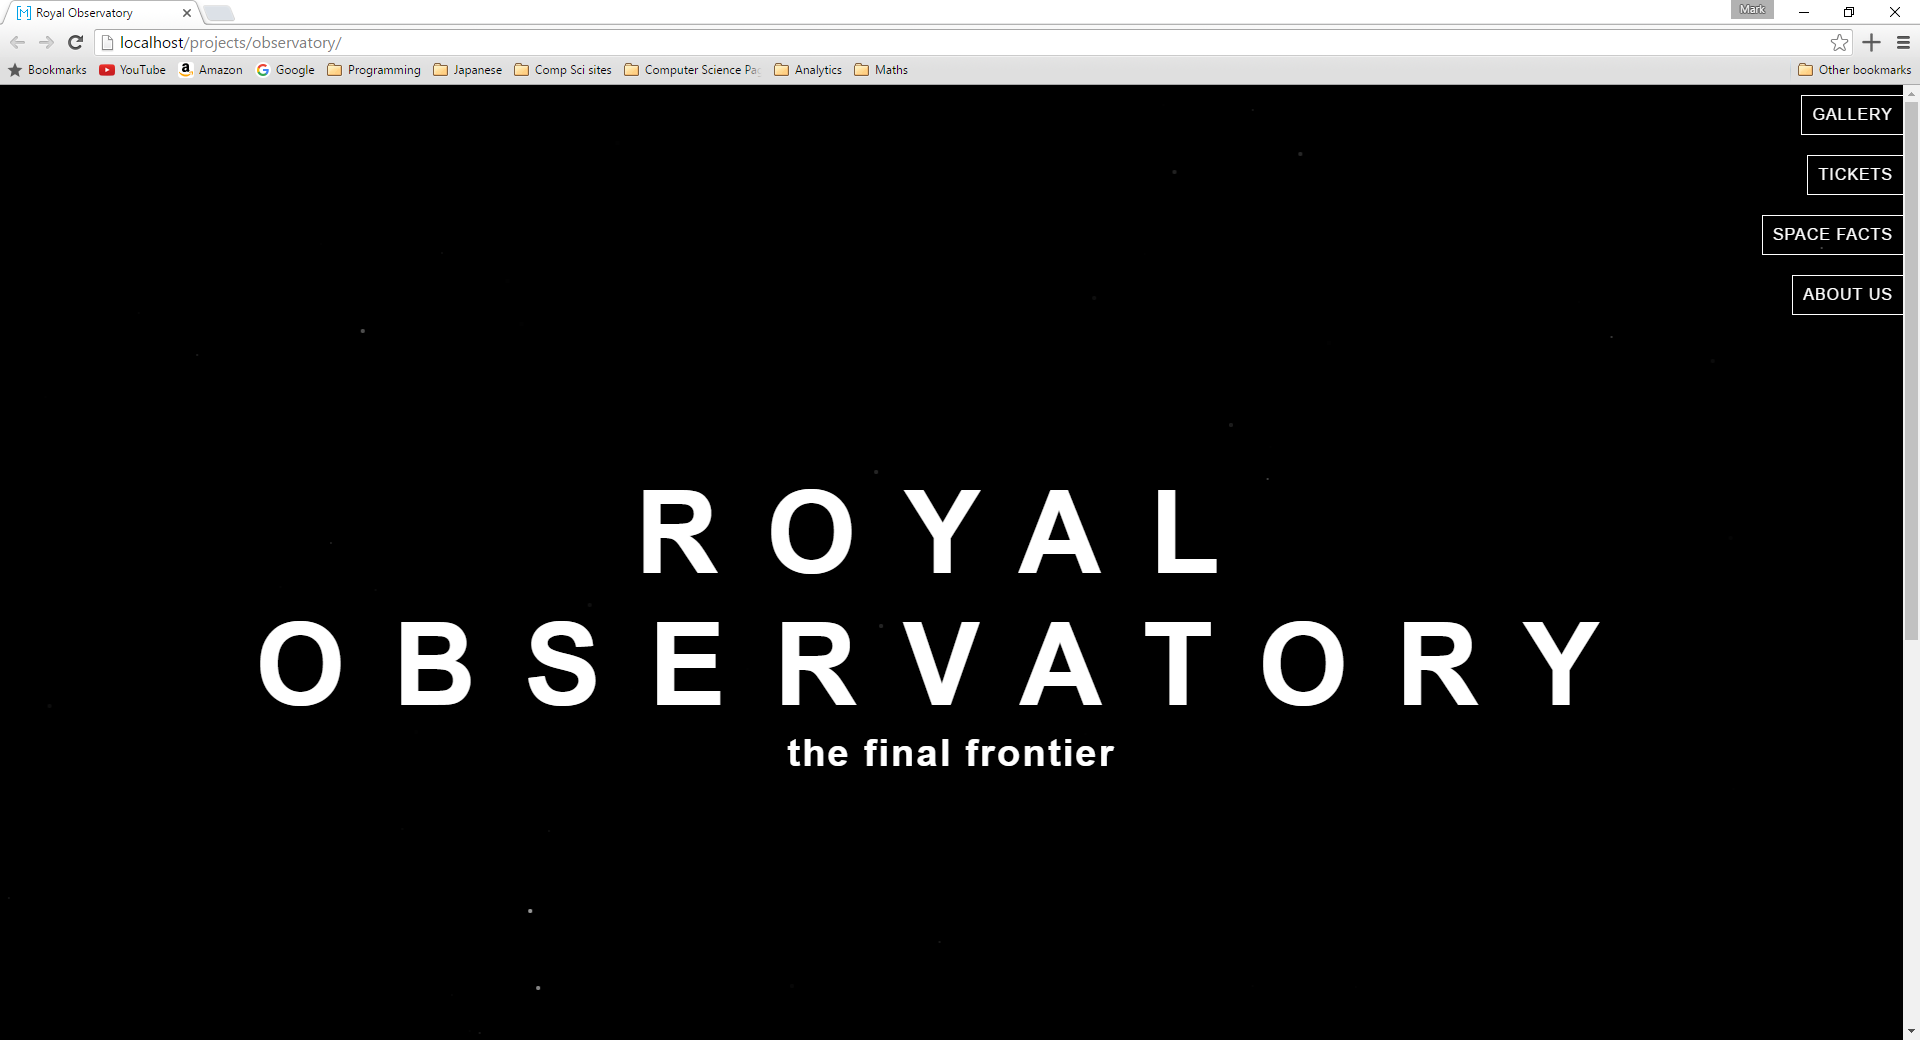
There were a few other prototypes which were made along side this one. One of which was an observatory where the animation was stars twinkling in the background. That template can be seen here. Keep in mind that these were not finished as I decided to pick a different topic altogether. This is why there will be some display issues regarding responsive design, such as the space facts page on the observatory site.
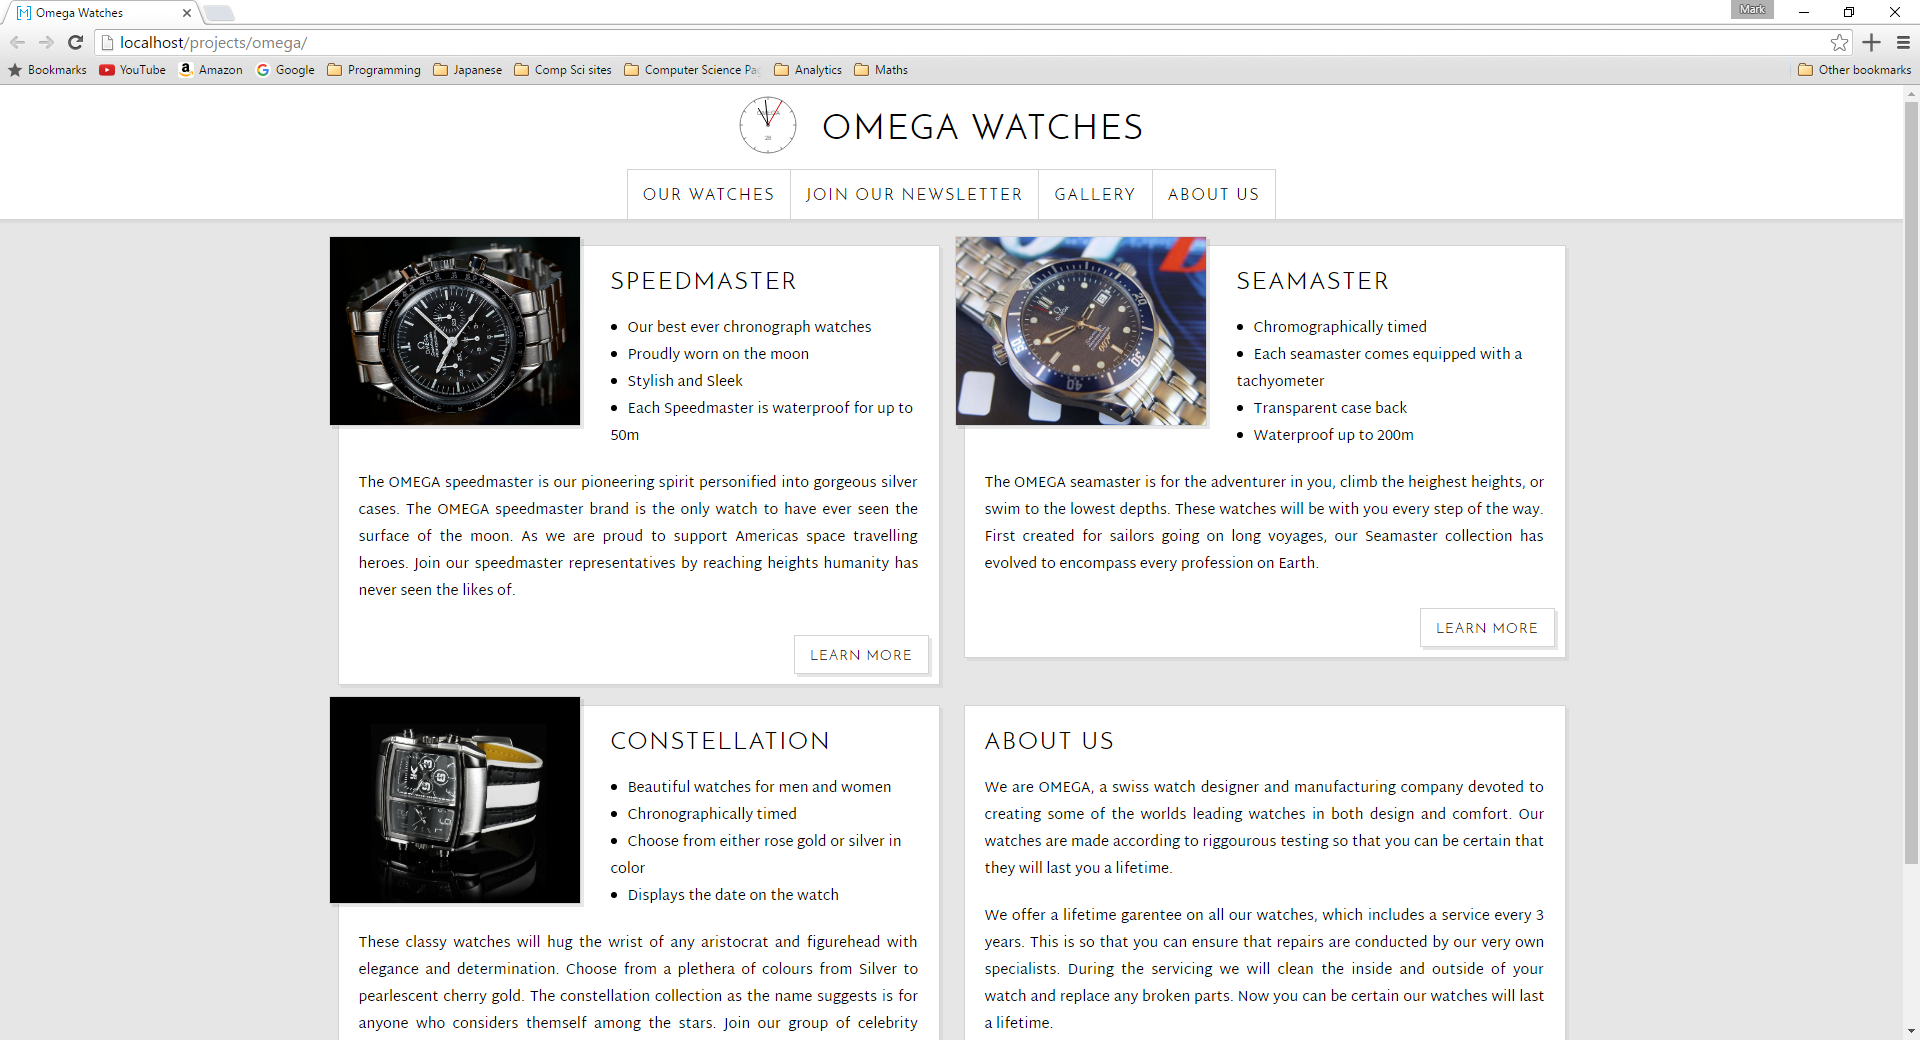
The finished design was for a watch company Omega (of course this is purely fictional and in no way actually affiliated with Omega). The animation this time was a small watch face which also acted as the home navigation button. There are a few strange features that the site also had to implement other than the animation. Which is why, in the footer, there are also some buttons which change the background color for the navbar as well as the font size. In the gallery there had to be an animation to increase the size of the images, this formed the basis for the image code on this site too! This piece of coursework was enough to earn me a mark of 89%.
Screenshots:
Links:
Description
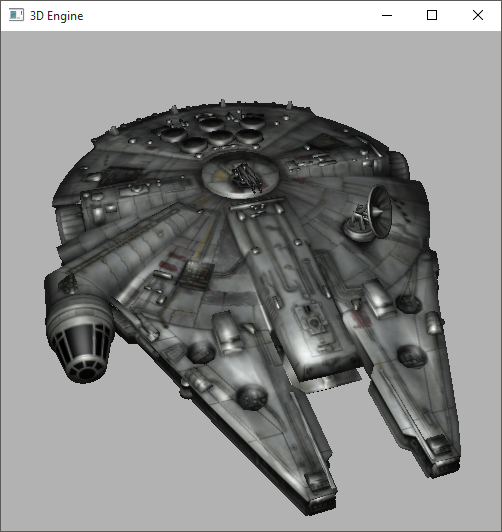
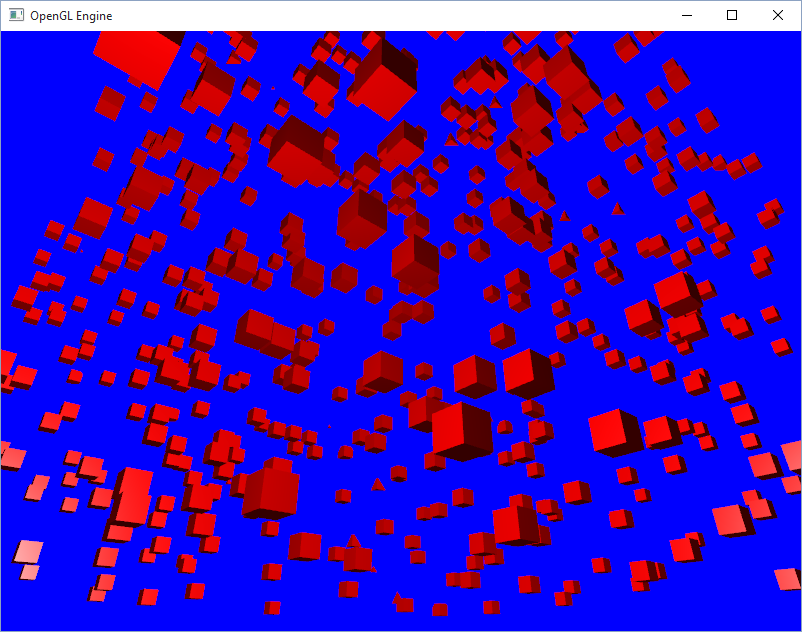
LWJGL is an openGL variant for Java programming, this engine is designed to use LWJGL in order to open and display 3D models as well as other various tasks.
The aim of this engine is to abstract away some of the openGL function calls and make programmatically displaying 3D models and textures very easy. The engine will also be capable of being used as a lower level game creation engine, as it will be effortless to load and move entities around the screen.
The LWJGL engine was the second openGL engine I made. It was a way of combining Java (the language I use the most) and a previous project I enjoyed making. Overall I am happy with the progress made, as it has reaffirmed some knowledge on openGL and ported a beloved project to a language I am more comfortable with.
Screenshots:
Links:
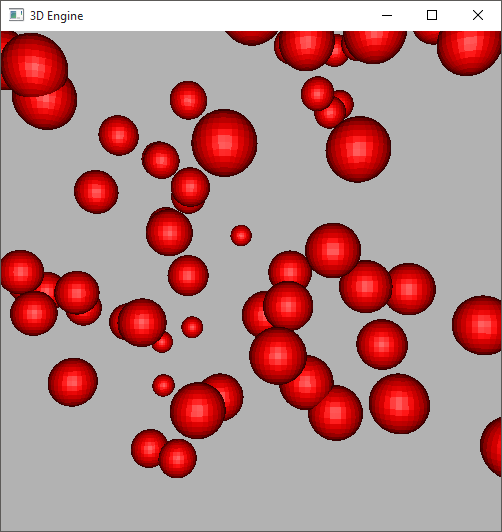
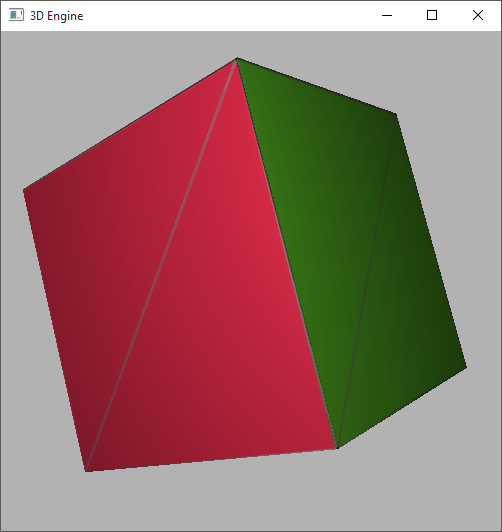
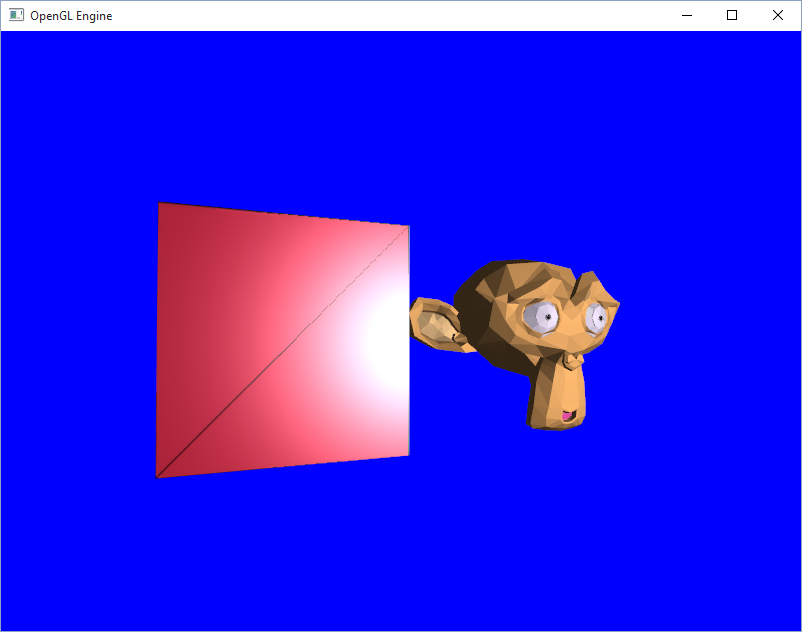
Description
A basic 3D engine to render a model into an openGL context. This engine is capable of reading both OBJ files as well as plain MODEL files (which only contains sets of vertices). Models can be textured using the models UV coordinates, and have a material which determines the way that the diffuse and specular lighting is handled. Once a model is loaded into the engine it can be attached to a scene at a given position and controlled using an update method.
This was the first openGL engine that I created, so it is a bit rough around the edges in comparison to the LWJGL engine. Creating this engine was also a great way for me to reacquaint myself with C++ after years of not using it. The engine also allowed me to learn about some interesting aspects of math which I might not have been able to look into otherwise. While the only mathematical class created by myself is the EulerAngle class, using the already implemented structures was still very interesting and fruitful. Thanks to both this engine and the LWJGL engine, I was able to pad out my handwritten mathematical notes which is something I always find quite fun!
Screenshots:
Links:
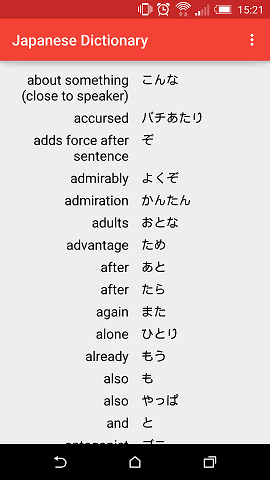
Description
This android app was made as a follow up from the Japanese Dictionary website. It was made so that I can access the Japanese site from anywhere and check against any words that I have learnt. This is really useful for me as I can check whether or not I have encountered a word before and whether or not I should recall the meaning. If the word is not in the dictionary, I can add it with ease. The app also supports editing and deleting words that have already been inserted into the dictionary. In order to find a word to perform an edit on, you can use the search bar.
The app was a great way to start learning android development after dabbling with it a few years before. However due to the way that the web framework was set up, I cannot give out copies of the app, as the dictionary can be edited without a need to login. Therefore, a future project I might make is a dictionary site that can be used as a personal dictionary for anyone who creates an account, along with sharing capabilities. This could be a great help to groups of people who are learning the same new language for example in a classroom situation.
The overall design of the app could have been better as at the moment it looks a little plain and doesn’t really draw much attention to itself as it is mostly plain text with a small color palette. The app was also not very well optimized as the dictionary was updated as soon as a new word was entered, meaning that the word list would reload when anything in the dictionary changes. In the future, I will make sure to create a more substantial plan for the app and corresponding web applications.
Screenshots:

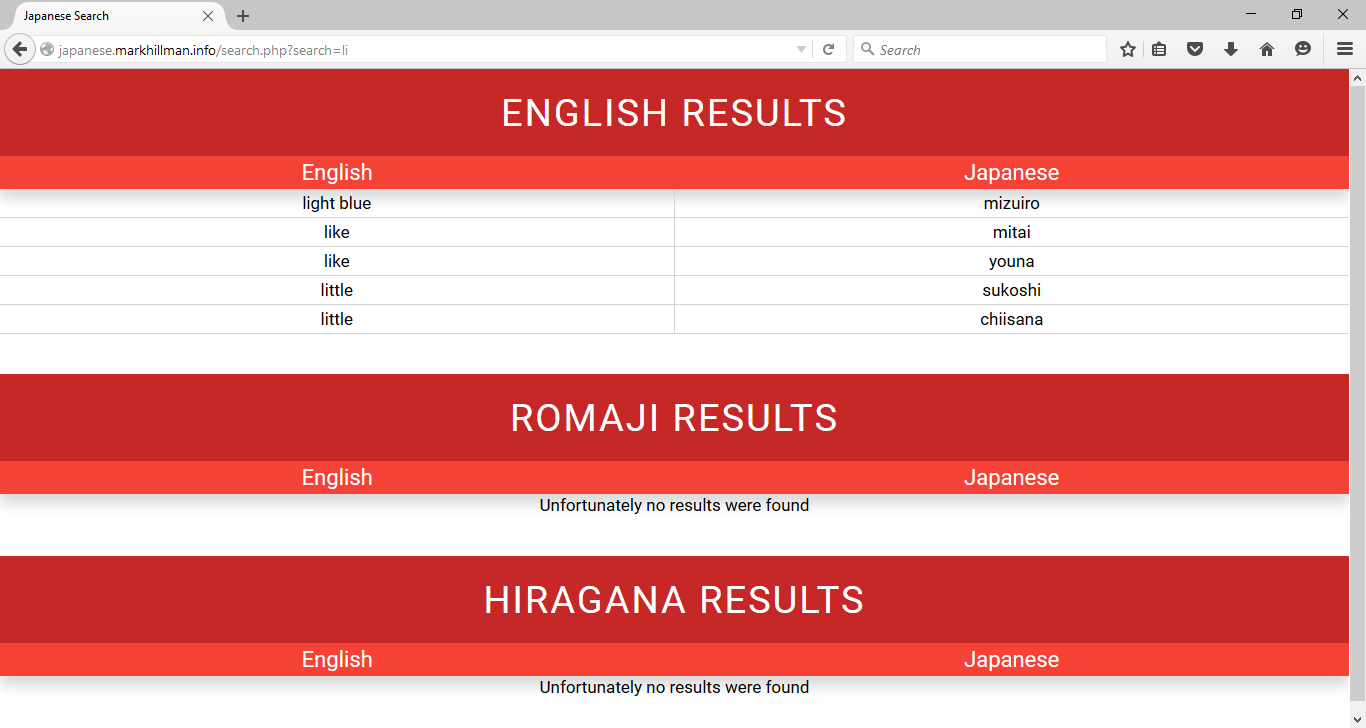
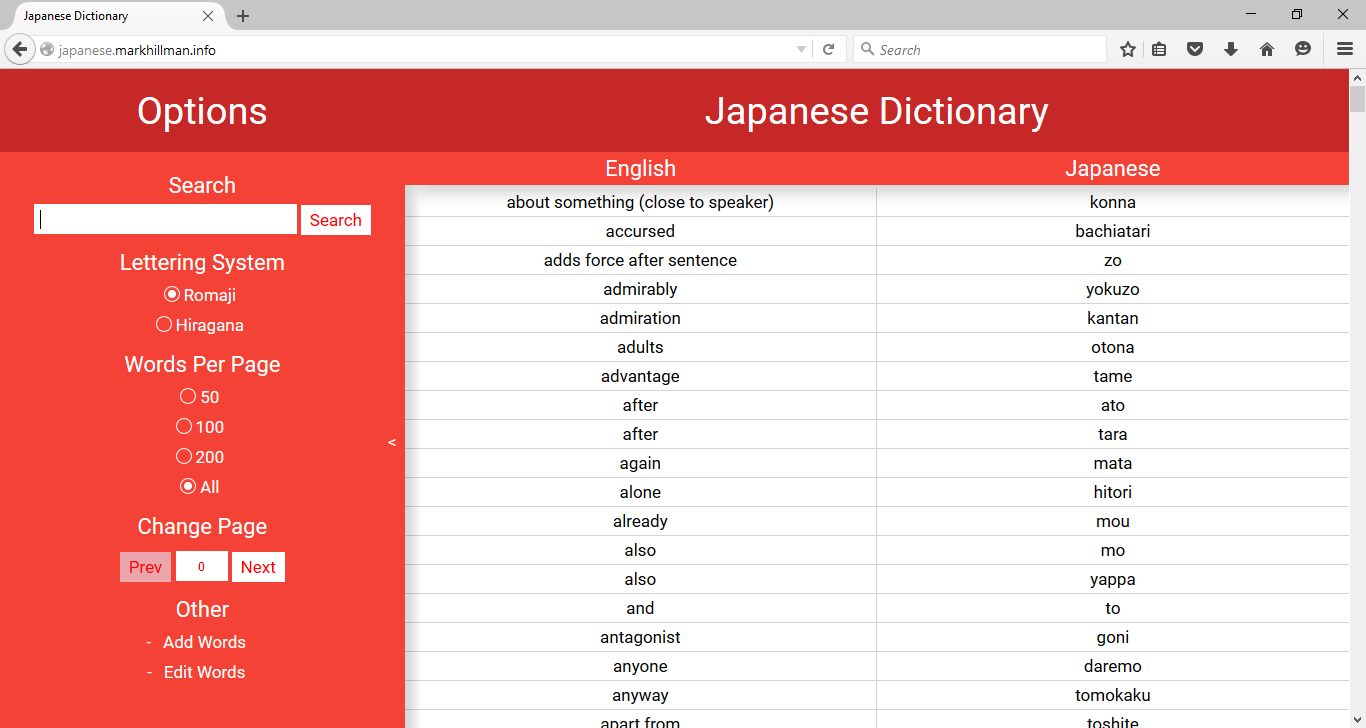
Description
The Japanese dictionary was created so that I could track what words I had currently learnt when I was studying Japanese. It also turned out to be a great opportunity to make a website which had a database. This would mean that I could create a database system and try to make it as secure as I could by stopping attacks that I learnt from a Cybercrime module and various Cyber-Security forums.
When the site was finally complete I asked some friends to pen-test it in order to make sure that any dangerous bugs could be fixed. Eventually they found ways to add to the dictionary by posting data through a cookie. This was quickly fixed and no bugs have been found since.
Screenshots:
Links:
Description
Tab manager is an extension for the Google chrome browser, where a user can view all of the currently open tabs in a vertical list instead of a horizontal one. This allows for much easier navigation when large amounts of tabs are open. The tab manager can also be opened when the browser is in fullscreen allowing the user to navigate the web without having to exit fullscreen mode.
Tab manager was an interesting project for me as it was a first for a lot of things. It was the first time I had made an extension, it was the first time I had used JSON and it was the first time I had made something asynchronous. The project was satisfying to complete and I hope that the small user base gets a lot of use from it.
Screenshots:
Links:
Description
MWindow was a quick project that I started in the first semester of University. It was a way of getting reacquainted with Java and learning about the inner workings of the Java Swing library. This project was a brief introduction to programming architecture design patterns as it was the first time that I had seen an observer pattern. Since then I have learnt a lot more about the design patterns but still look back with fondness at this project.
The MWindow package is a minimalist UI redesign for the swing package. MWindow allows for the easy creation of a blank windows, as well as a better looking frame for a draggable window. The project was madel for java swing so the implementation is compatible with swing in general and the classes have similar methods. This is due to the components being subclasses of the respective Java Swing class. For example, MButton is just an extension of JButton with an overrided paintComponent method.
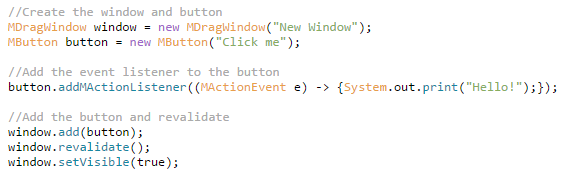
Examples
Input
//Create the window and button
MDragWindow window = new MDragWindow("New Window");
MButton button = new MButton("Click me");

//Add the event listener to the button
button.addMActionListener((MActionEvent e) -> {System.out.print("Hello!");});

//Add the button and revalidate
window.add(button);
window.revalidate();
window.setVisible(true);
Screenshots: